border-radiusで歪んだ円を作る方法
border-radiusの使い方のおさらいから、
border-radiusを使って歪んだ円を作成する方法をご紹介します。
border-radiusの基本的な使い方
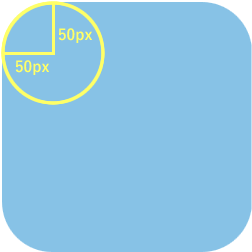
・値が1つの場合
|
1 2 3 4 5 6 |
.redius01 { width: 200px; height: 200px; background-color: #73B8E2; border-radius: 50px; } |
四隅に同じ値の角丸が適用されます。
・値が4つの場合
|
1 2 3 4 5 6 |
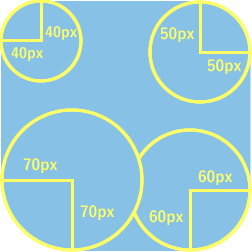
.redius02 { width: 250px; height: 250px; background-color: #73B8E2; border-radius: 10px 20px 30px 40px; } |
左上から時計周りに、左上、右上、右下、左下 の順で値を指定します。
四隅それぞれに異なる角丸を適用できます。
border-radiusで正円をつくる
|
1 2 3 4 5 6 |
.circle01 { width: 250px; height: 250px; background-color: #73B8E2; border-radius: 50%; } |
border-radiusで歪んだ円をつくる
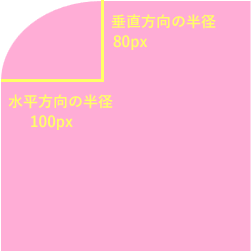
値を/(スラッシュ)で区切ることで、水平方向の半径と垂直方向の半径を指定することが出来ます。
border-radius: 水平方向の半径/垂直方向の半径;
|
1 2 3 4 5 6 |
.circle02 { width: 250px; height: 250px; background-color: #73B8E2; border-radius: 100px 0 0 0 / 80px 0 0 0; } |
四隅にそれぞればらばらの水平方向の半径/垂直方向の半径を指定することで、歪んだ円を作ることができます。
|
1 2 3 4 5 6 |
.circle03 { width: 250px; height: 250px; background-color: #FFADD6; border-radius: 55% 45% 55% 45% / 40% 55% 45% 60%; } |
歪んだ円で画像をトリミングする
・html
|
1 |
<div class="circle04"><img src="images/demo_border-radius01.jpg"></div> |
・css
|
1 2 3 |
.circle04 img { border-radius: 55% 45% 55% 45% / 40% 55% 45% 60%; } |

四角形のjpg画像をcssで歪んだ円にトリミングした方が、
歪んだ円でマスクした画像を透過pngで書き出すよりも軽量化できるメリットがあります。
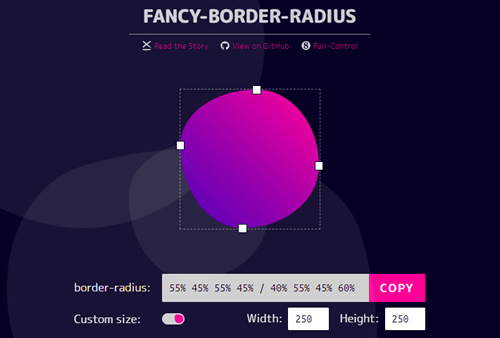
歪んだ円をプレビューしながら確認できるジェネレーター
border-radiusの値を変えながらプレビューで確認出来るので便利です。
![MARKLEAPS[マークリープス]](https://markleaps.com/blog/wp-content/themes/mkl/images/00_logo.png)
